7 Easy DIY Christmas Snowman Crafts to Bring Winter Magic Home
Snowman crafts are a timeless holiday tradition that brings warmth, creativity, and festive cheer into the home. Whether you are aiming to style a cozy rustic mantel, assemble budget-friendly handmade gifts for loved ones, or organize a craft afternoon with family, these seven comprehensive snowman projects deliver maximum visual charm using simple, accessible supplies.
Cozy Rice & Tube Sock Snowmen

This budget-friendly project transforms basic household items into weighted, plush snowmen that look like boutique winter decor. Because they are weighted, they make fantastic doorstops, bookends, or tabletop accent pieces.
- Materials Needed: White crew or tube socks, 2 to 3 cups of uncooked white rice, small rubber bands, orange felt scraps, black fabric marker, colorful fabric scraps or ribbon (for scarves), baby socks (for beanie hats), hot glue gun, and fabric scissors.
- Estimated Project Time: 15–20 minutes
- Difficulty Level: Beginner
Step-by-Step Instructions:
- Prep the Base: Cut off the leg portion of a plain white tube sock approximately 1 inch above the heel seam. Save the upper cuff for later use if needed, but work primarily with the foot tube.
- Secure the Bottom: Turn the sock inside out. Gather the cut bottom edge tightly and wrap a rubber band around it multiple times until completely sealed. Turn the sock back right-side out so the rubber band knot is hidden internally at the bottom.
- Fill with Rice: Open the sock wide and carefully pour in 2 to 3 cups of uncooked white rice. Tap the sock gently against your work table so the rice settles evenly into a stable, flat base.
- Seal the Top: Once filled to your desired height, bundle the top opening of the sock together right above the rice line and secure it tightly with a second rubber band.
- Form the Segments: Pinch the upper third of the filled sock to divide the head section from the body section. Wrap a third rubber band around this indented neck area to lock in the classic two-tiered snowman silhouette.
- Add the Scarf: Cut a 1-inch wide by 12-inch long strip of plaid, flannel, or knit scrap fabric. Tie it neatly around the snowman’s neck, completely covering the middle rubber band. Fray the ends of the fabric slightly for a cozy, distressed look.
- Craft the Beanie Hat: Take a colorful patterned baby sock, roll up the bottom cuff once, and place it directly over the top rubber band to form a tight winter hat. Secure it with a tiny drop of hot glue at the back of the head.
- Detail the Face: Using a fine-tip black fabric marker, draw two solid dots for eyes and five tiny dots in a curved line to create a classic coal smile. Cut a 1/2-inch triangle from orange felt, roll it tightly into a mini cone shape, and hot glue it between the eyes and mouth to serve as the carrot nose.
Key Takeaway: Uncooked dry rice provides an adjustable, self-weighting base that prevents your fabric snowmen from tipping over on mantle displays or window sills.
Rustic Mason Jar Snowman Lanterns

Mason jar snowmen combine ambient lighting with festive crafting. When illuminated from within by flickering LED lights, these painted or frosted glass jars cast a warm, comforting winter glow across any tabletop, porch, or entryway.
- Materials Needed: Clear glass mason jars (pint or quart size), white acrylic craft paint OR coarse Epsom salt, Matte Mod Podge, orange and black oil-based paint pens, battery-operated LED tea lights or fairy lights, sponge paintbrushes, and 1.5-inch wide burlap or plaid ribbon.
- Estimated Project Time: 30 minutes (plus 1 hour drying time)
- Difficulty Level: Easy
Step-by-Step Instructions:
- Clean the Surface: Wipe down the exterior of your glass mason jars with rubbing alcohol and a paper towel to eliminate grease or fingerprints. Let air dry for 2 minutes.
- Apply the Base Finish:
- For a Smooth Matte Look: Use a sponge brush to apply 2 thin, even coats of white acrylic craft paint across the entire exterior. Allow 30 minutes of drying time between coats.
- For a Frosted Snow Look: Coat the outer glass with a thick, generous layer of Mod Podge. While the glue is wet, hold the jar over a tray and roll it through a heavy layer of coarse Epsom salt until fully coated. Let dry for 1 hour.
- Draw the Coal Face: Once the base coat is completely dry, take a black oil-based paint pen and draw two solid 1/4-inch circles near the top third of the jar for eyes. Below the eyes, draw 5 to 6 smaller black dots in a wide arc to form a traditional coal smile.
- Add the Nose: Using a bright orange paint pen, draw a long, narrow triangle starting from the center of the face and extending slightly outward toward the right cheek. Fill in the shape completely.
- Tie the Scarf: Wrap a piece of burlap, twine, or red plaid ribbon twice around the threaded glass neck at the top of the jar. Tie it into a simple knot or bow, allowing the excess ribbon tails to hang down the front side.
- Illuminate: Drop a battery-powered flickering LED tea light or a short strand of micro LED fairy lights inside the jar. Screw the metal lid ring back on (without the flat inner lid) to complete the lantern.
Key Takeaway: Always opt for battery-operated LED lighting inside coated glass jars to avoid smoke residue, overheating, or melting glue finishes.
Upcycled Wood Slice Snowman Ornaments
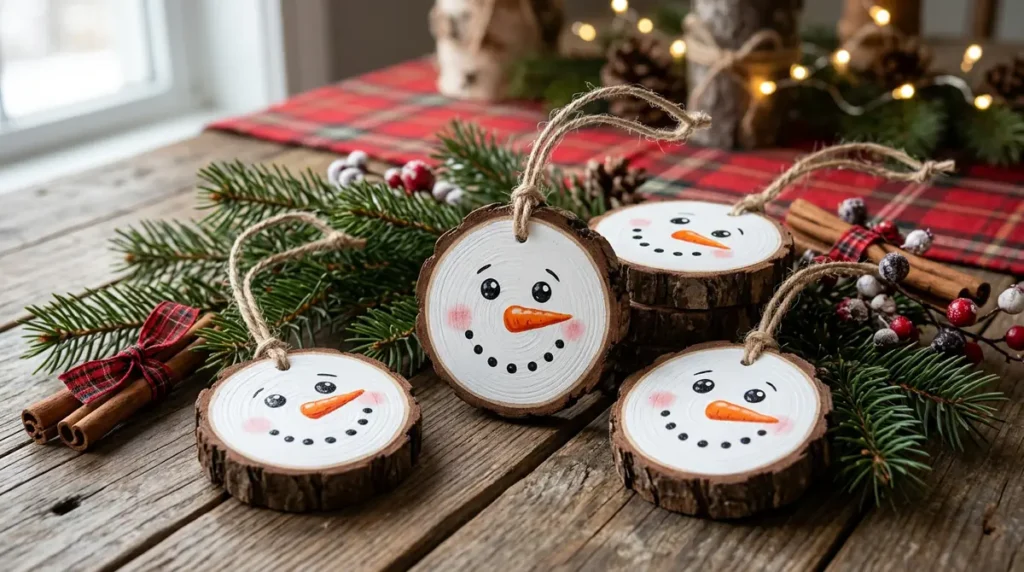
Crafted from natural tree branch cross-sections, these wood slice ornaments inject a rustic, farmhouse-style element into your Christmas decor. They function beautifully as Christmas tree ornaments, holiday garland accents, or personalized gift tags.
- Materials Needed: Pre-drilled natural wood slices (2.5 to 3.5 inches in diameter with bark intact), white acrylic paint, fine-point acrylic paint pens (black, orange, white), small detail paintbrush, tiny screw eye hooks (if not pre-drilled), clear matte sealer spray, and jute twine.
- Estimated Project Time: 25 minutes
- Difficulty Level: Easy
Step-by-Step Instructions:
- Prepare the Wood Slice: Ensure your wood slices are smooth and clean. If necessary, lightly sand the flat front surface with fine-grit sandpaper to remove rough spots, taking care not to detach the outer bark ring.
- Paint the Face Background: Using a round paintbrush, apply white acrylic paint to the flat face of the wood slice. Paint in smooth, circular strokes, leaving a 1/8-inch border of natural bark exposed around the entire outer perimeter. Let dry for 15 minutes.
- Paint the Coal Eyes & Smile: Take your black fine-tip paint pen and draw two dark eyes in the upper middle area. Add a small white paint dot inside each black eye to create a lifelike “catchlight” reflection. Below the eyes, render five small, textured black dots for the coal mouth.
- Render the Carrot Nose: Draw a sharp orange triangle nose sweeping sideways from between the eyes. Add 2 to 3 thin, curved black lines across the carrot to give it authentic texture and dimension.
- Highlight the Cheeks (Optional): Dip your pinky finger or a dry stencil brush into a tiny drop of pink acrylic paint and dab lightly onto the cheeks for a rosy, wind-chilled appearance.
- Seal and Hardware: Spray the finished piece with a light coat of matte clear acrylic sealer to prevent paint chipping. Once dry, screw an eye hook into the top edge (or utilize the pre-drilled hole), thread a 7-inch length of jute twine through, and tie the ends into a secure hanging loop.
Key Takeaway: Retaining the unpainted outer bark perimeter creates an intentional frame that emphasizes the natural, hand-cut character of rustic wooden ornaments.
Fluffy Yarn Pom-Pom Snowman Figurines

Soft, tactile, and charming, yarn pom-pom snowmen are a hit with crafters of all ages. Their lightweight construction makes them ideal for nestling into tree branches, stringing onto mantle banners, or attaching to holiday package bows.
- Materials Needed: White medium-weight acrylic yarn, cardboard pom-pom makers (or a large fork/cardboard rings), fabric scissors, hot glue gun, 4mm black beads (or small black felt dots), miniature orange felt triangles, small real-wood twigs, and mini knitted scarves or ribbon.
- Estimated Project Time: 35 minutes
- Difficulty Level: Intermediate
Step-by-Step Instructions:
- Wind the Body Pom-Pom: Wrap white yarn around a 3-inch pom-pom maker roughly 100 to 120 times until full and thick. Tie a tight double knot around the middle bundle using a sturdy strand of yarn, then cut the outer loops open.
- Wind the Head Pom-Pom: Repeat the wrapping process on a smaller 2-inch pom-pom maker, wrapping approximately 70 to 80 times to ensure dense yarn volume. Tie off tightly and cut open.
- Sculpt the Spheres: Take sharp fabric scissors and trim the outer fuzz of both pom-pom balls extensively. Trimming reduces their size slightly but makes them dense, plush, and perfectly round.
- Join the Sections: Part the yarn fibers at the top of the larger pom-pom and the bottom of the smaller pom-pom to reveal their inner core ties. Apply a generous pool of hot glue to the center tie of the larger pom-pom and press the head pom-pom firmly onto it for 30 seconds.
- Attach Facial Details: Glue two 4mm black plastic beads onto the head pom-pom for eyes. Roll a tiny orange felt triangle into a miniature cone and hot glue it between the beads to create the carrot nose.
- Add Twig Arms: Gather two slender, branched real-wood twigs (about 2.5 inches long). Dip the cut ends into hot glue and push them deep into the sides of the larger body pom-pom until locked against the core thread.
- Finish with Accessories: Tie a thin strip of red felt or miniature ribbon around the neck joint to hide any visible glue marks and complete your plush figurine.
Key Takeaway: The secret to high-end pom-pom crafts lies in trimming: cutting away generous amounts of loose yarn ends creates a dense, velvety surface that holds its shape.
Terracotta Pot Snowman Stack
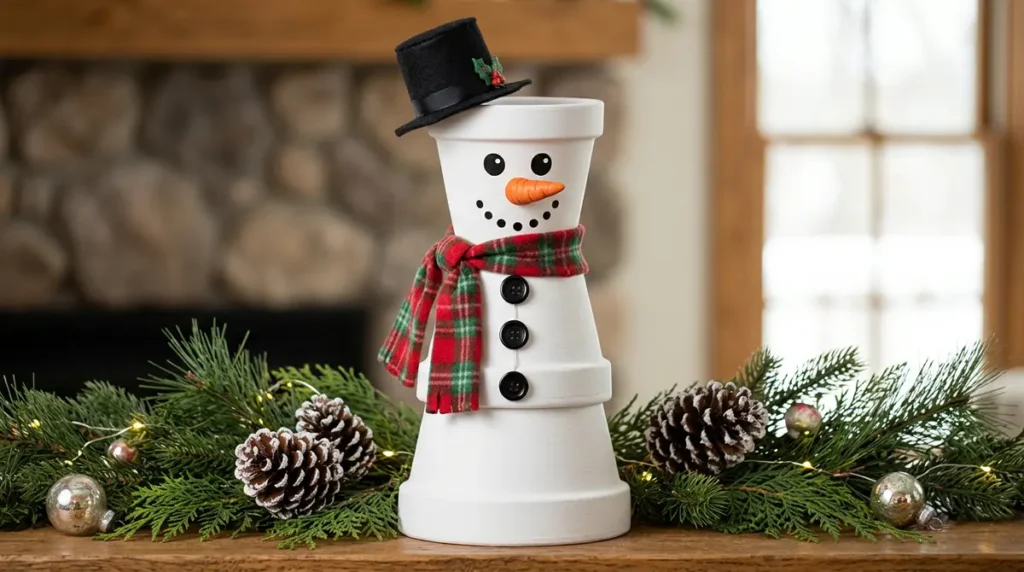
This sculptural project transforms basic clay garden pots into a durable, structured tabletop centerpieces. Stacking graduating sizes provides stability and architectural height that stands out on entryway tables or holiday mantels.
- Materials Needed: 3 clay terracotta pots in graduating sizes (e.g., 4-inch, 3-inch, and 2-inch diameter), white outdoor spray paint (matte or satin finish), hot glue gun or heavy-duty construction adhesive, black wooden buttons, mini black doll top hat, orange polymer clay or felt, and craft paintbrushes.
- Estimated Project Time: 45 minutes (plus 45 minutes paint drying)
- Difficulty Level: Intermediate
Step-by-Step Instructions:
- Paint the Pots: Clean off any dust from the terracotta pots. Outdoors or in a well-ventilated area, apply 2 complete coats of white spray paint over the outer walls and rims of all three pots. Allow 20 minutes to dry between coats.
- Build the Foundation: Turn the largest (4-inch) terracotta pot upside down on your workspace so the flat bottom faces up. This serves as the heavy, wide base of the snowman.
- Stack the Torso: Run a continuous thick line of hot glue or construction adhesive along the bottom rim of the inverted medium (3-inch) pot. Place it upside down directly onto the flat base of the largest pot, centering it carefully. Press firmly for 45 seconds.
- Attach the Head: Apply glue along the bottom rim of the smallest (2-inch) pot and mount it upside down on top of the medium pot to complete the three-tiered structure.
- Attach Buttons: Hot glue 2 to 3 black wooden buttons vertically down the center front of the bottom and middle pot sections.
- Paint the Face: On the top pot, use black craft paint to dab two large eyes and five smile dots. Glue a sculpted orange clay nose in the middle.
- Top it Off: Hot glue a miniature black fabric top hat at a jaunty angle onto the top flat rim of the head pot. Wrap a cozy fleece scarf around the seam where the top and middle pots meet.
Key Takeaway: Inverting and stacking rigid clay pots yields an architectural structure that will not sag or crush over time compared to stuffed fabric alternatives.
Cinnamon Stick Snowman Ornaments
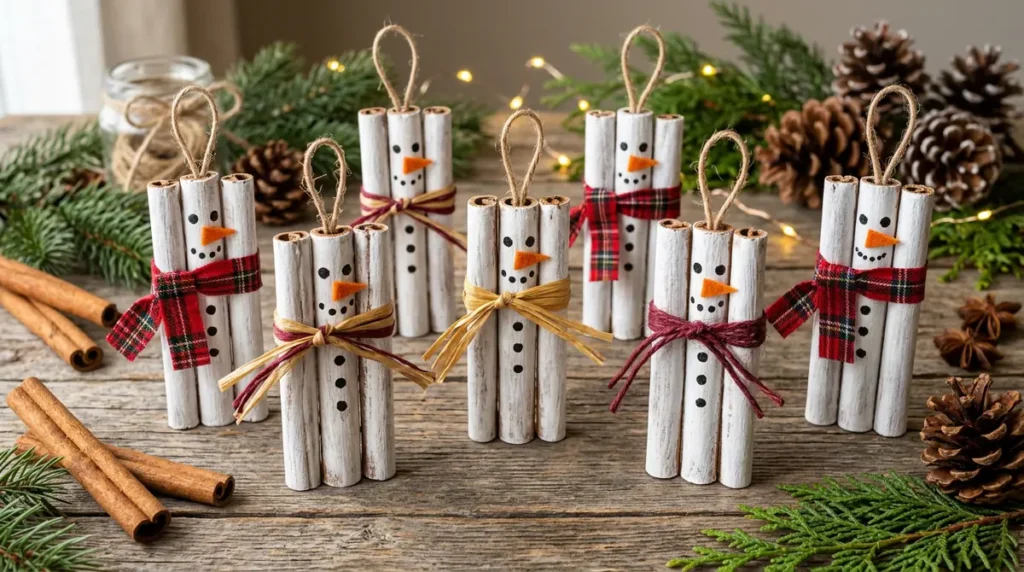
Combining festive craft visual charm with natural holiday aromas, cinnamon stick ornaments are a sensory addition to Christmas tree decorating. As the warmth of tree lights hits the cinnamon, it releases a subtle, festive fragrance throughout the room.
- Materials Needed: Whole cinnamon sticks (approx. 4 inches long; 4 sticks per craft), white acrylic paint, fine-tip black marker, orange felt, raffia or festive plaid ribbon, hot glue gun, paintbrushes, and jute twine.
- Estimated Project Time: 20 minutes
- Difficulty Level: Easy
Step-by-Step Instructions:
- Construct the Panel: Line up 3 to 4 whole cinnamon sticks vertically side-by-side on your work surface so their top edges align relatively evenly.
- Secure the Backing: Snap another cinnamon stick (or a craft stick) in half horizontally. Apply hot glue across the back of the aligned cinnamon sticks and press the brace piece down firmly to lock all sticks into a flat panel.
- Apply a Dry-Brush Finish: Dip a dry paintbrush lightly into white acrylic paint, dab off the excess on a paper towel, and sweep the brush vertically across the front face of the cinnamon sticks. This “dry-brushing” technique coats the raised edges in white while allowing the rich brown wood texture to peek through the crevices. Let dry for 10 minutes.
- Draw the Features: Use a fine-point black permanent marker or paint pen to draw coal eyes and a dot smile across the top third of the painted panel.
- Attach the Nose: Cut a tiny 1/3-inch orange felt triangle and hot glue it directly underneath the drawn eyes.
- Add the Scarf: Wrap 2 to 3 strands of natural raffia or a narrow strip of plaid fabric around the middle of the cinnamon stick panel. Tie it into a rustic knot on the front right side.
- Create the Hanger: Glue a folded loop of jute twine to the top back brace stick, allowing it to dry completely before hanging on your tree.
Key Takeaway: Leave the back of the cinnamon sticks entirely unpainted and unglued so the natural bark can continuously diffuse its aromatic spice scent into your living space.
Salt Dough Snowman Keepsakes

Salt dough is a time-tested, economical modeling medium ideal for sculpting custom, long-lasting holiday keepsakes. This craft is particularly suited for creating handprint ornaments, custom silhouettes, or textured family keepsakes that last for years.
- Materials Needed: 2 cups all-purpose flour, 1 cup table salt, 1 cup warm water, acrylic paints (white, black, orange, red, green), clear gloss spray sealer, drinking straw, rolling pin, snowman cookie cutters (or a butter knife), and satin ribbon.
- Estimated Project Time: 1 hour preparation (plus 2.5 hours baking)
- Difficulty Level: Intermediate
Step-by-Step Instructions:
- Mix the Dough: In a large mixing bowl, combine 2 cups of flour and 1 cup of salt. Gradually pour in 1 cup of warm water while stirring continuously. Once a shaggy dough forms, transfer it to a floured board and knead with your hands for 5 to 7 minutes until smooth, pliable, and non-sticky.
- Roll and Cut: Roll the dough out evenly with a rolling pin to a uniform 1/4-inch thickness. Use a snowman-shaped cookie cutter to stamp out silhouettes, or cut three overlapping circles with a butter knife to form custom figures.
- Punch the Hanging Hole: Press the end of a plastic drinking straw near the top edge of each dough snowman to punch a clean, round hole for the ribbon. Do not skip this step, as drilling hardened dough later can cause cracking.
- Bake Slowly: Place the dough figures on a parchment-lined baking sheet. Bake in an oven preheated to 250°F (120°C) for 2 to 2.5 hours. Turn the pieces over halfway through baking so both sides dry flat and solid without puffing.
- Cool and Paint: Remove from the oven and let cool completely on a wire rack for 30 minutes. Paint the entire surface with a base coat of white acrylic paint. Once dry, use small detail brushes to add black coal eyes, an orange carrot nose, black buttons, and a colorful striped scarf.
- Protect and Hang: Spray both sides of the painted ornament with a clear acrylic sealant to shield the dough from atmospheric humidity. Once dry, thread a 1/4-inch satin ribbon through the hole and knot the ends to create a loop.