7 Creative Thanksgiving Pipe Cleaner Crafts for Kids and Adults
Thanksgiving is the perfect time to enjoy creative activities, add handmade decorations to your home, and spend meaningful moments with family and friends. While traditional Thanksgiving decorations often include pumpkins, colorful leaves, turkeys, and autumn wreaths, you can create something equally beautiful using one of the simplest and most affordable craft supplies: pipe cleaners. These flexible, fuzzy craft materials are easy to bend, twist, shape, and connect, making them ideal for creating festive Thanksgiving decorations without needing expensive tools or complicated crafting skills.
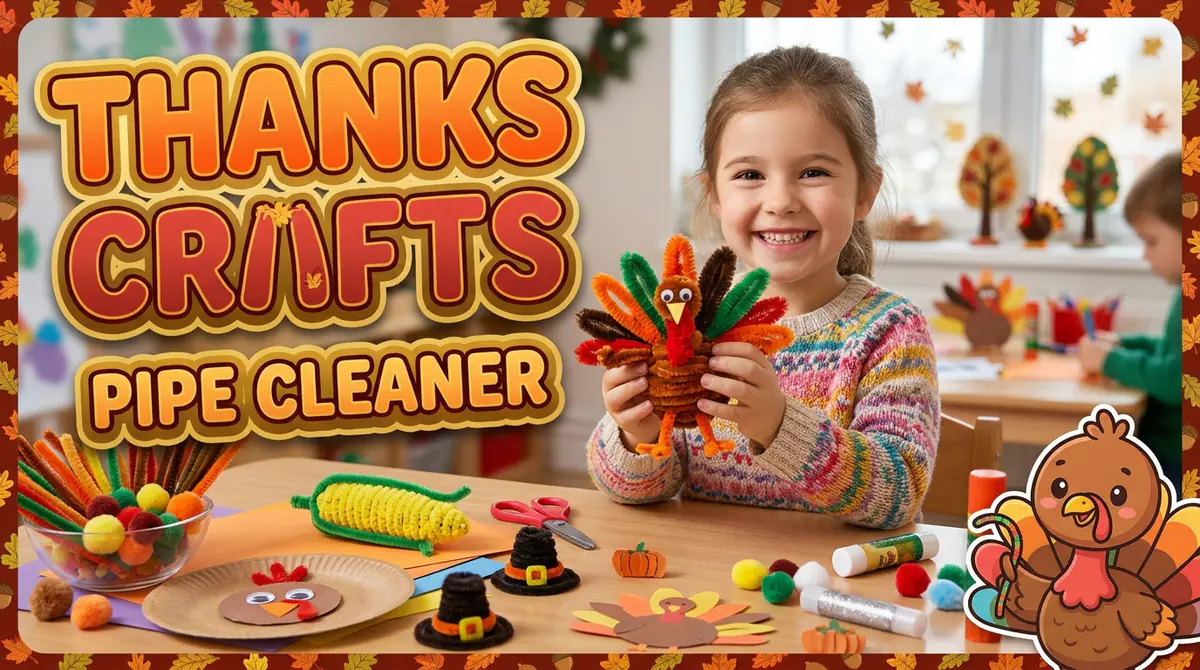
Thanksgiving pipe cleaner crafts are especially enjoyable because they offer endless opportunities for creativity. You can transform ordinary pipe cleaners into adorable turkeys, miniature pumpkins, colorful autumn leaves, corn decorations, festive napkin rings, and beautiful seasonal garlands. Children can experiment with different shapes and colors, while adults can use more detailed techniques to create decorative pieces for dining tables, mantels, shelves, and entryways.
Another wonderful advantage of pipe cleaner crafts is that they are budget-friendly and beginner-friendly. Most projects require only a few basic supplies, such as pipe cleaners, scissors, craft glue, beads, cardboard, and small decorative accessories. Many designs can be completed in less than an hour, making them suitable for classroom activities, family crafting afternoons, Thanksgiving parties, and holiday preparations.
Whether you are searching for Thanksgiving crafts for kids, creative autumn decorations, or handmade Thanksgiving table accessories, these seven pipe cleaner craft ideas offer something for everyone. Each project includes material suggestions, step-by-step instructions, decorating ideas, and helpful tips to make crafting easier and more enjoyable.
Colorful Pipe Cleaner Thanksgiving Turkeys
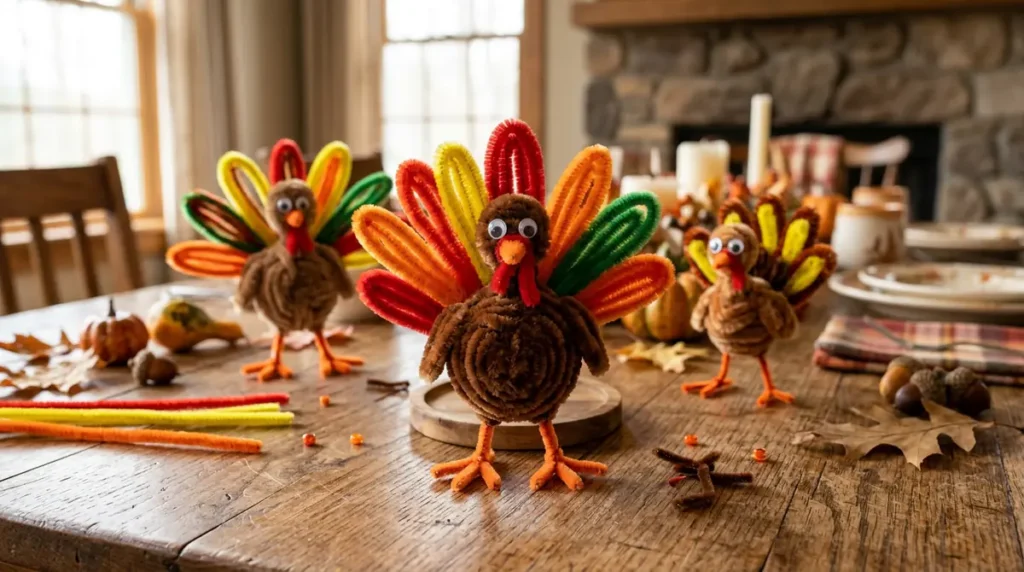
A colorful pipe cleaner turkey is one of the most recognizable and enjoyable Thanksgiving crafts to make with children and adults. Turkeys are strongly associated with Thanksgiving celebrations, and creating a miniature version using flexible pipe cleaners is a wonderful way to bring seasonal creativity into your home. Instead of purchasing ready-made decorations, you can make personalized turkeys in different colors, sizes, and styles using inexpensive materials.
This project is particularly suitable for younger children because it involves simple bending, twisting, and arranging rather than complicated cutting or assembly. Children can choose their favorite feather colors, create funny facial expressions, and give each turkey its own personality. Adults can also make more detailed versions for decorating Thanksgiving tables, classroom displays, or autumn-themed shelves.
Materials You Will Need
- Brown pipe cleaners for the turkey’s body.
- Red, orange, yellow, and green pipe cleaners for colorful feathers.
- Two small googly eyes.
- Orange craft foam or construction paper for the beak.
- Red felt or paper for the wattle.
- Small pieces of orange pipe cleaner for the legs.
- Craft glue.
- Scissors.
- Optional wooden beads or cardboard for additional support.
Step-by-Step Instructions
Step 1: Create the turkey’s body. Take a brown pipe cleaner and bend it into a small oval or rounded shape. Twist the ends together securely to hold the shape. You can also wrap the pipe cleaner around two fingers to create a compact spiral body. Adjust the shape until it resembles a small turkey body.
Step 2: Make the colorful feathers. Choose several pipe cleaners in autumn colors, including yellow, orange, red, and green. Bend each one into a teardrop-shaped loop. Twist the ends together to secure them. Arrange the loops behind the body to create a beautiful fan-shaped tail.
Step 3: Attach the facial features. Glue two googly eyes onto the front of the brown body. Cut a tiny triangular beak from orange paper or craft foam and attach it underneath the eyes. Add a small red felt wattle beside the beak to give your turkey a recognizable appearance.
Step 4: Add the legs. Cut two short orange pipe cleaner pieces and twist them around the bottom of the turkey’s body. Bend their ends outward to create little feet. Make sure the legs are balanced so the turkey can stand properly.
Step 5: Personalize your turkey. Add small beads, decorative feathers, or a miniature paper pilgrim hat. You can also make several turkeys with different feather combinations to create a colorful Thanksgiving display.
Creative Decorating Ideas
Use these adorable turkeys as Thanksgiving table decorations, classroom centerpieces, or little handmade gifts for family members. You can also attach a small name tag to each turkey and use it as a personalized place card for Thanksgiving dinner.
For a children’s activity, provide different pipe cleaner colors and allow everyone to design a unique turkey. Encourage children to choose unusual color combinations, experiment with feather arrangements, and give their turkeys funny names.
Helpful Tip: If young children are participating, adults should handle scissors and small accessories. Use a small cardboard base underneath the turkey if you want it to stand more securely.
Mini Pipe Cleaner Pumpkins for Autumn Decorations
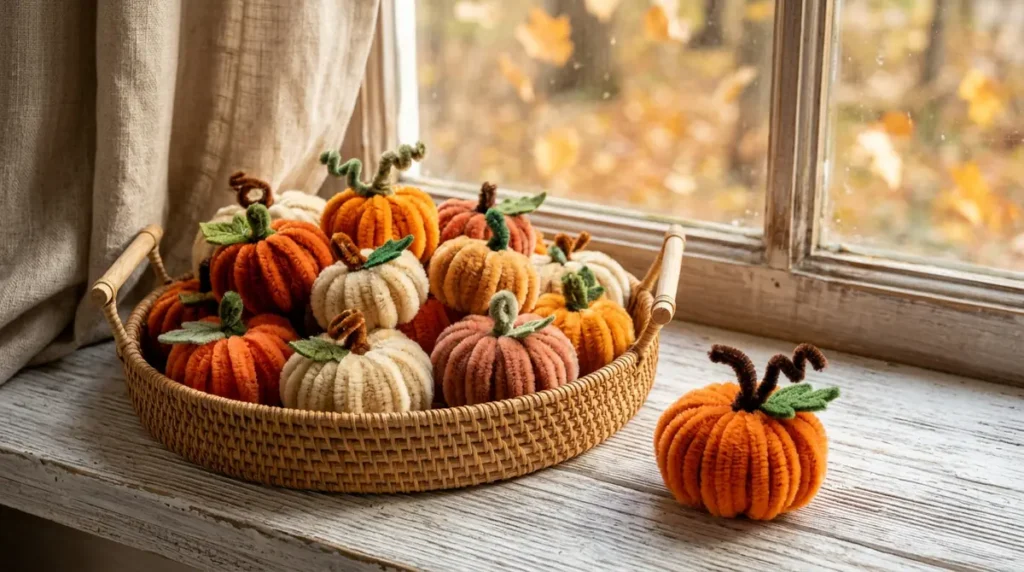
Pumpkins are among the most popular symbols of autumn and Thanksgiving. Their warm orange color, rounded shape, and natural seasonal appearance make them wonderful decorations for almost any holiday setting. While real pumpkins are beautiful, miniature pipe cleaner pumpkins provide a creative alternative that can be reused year after year. They are inexpensive to make, require very few materials, and can be customized to match different decorating styles.
These little pumpkins work especially well for people who enjoy handmade autumn decorations but do not have much time for complicated DIY projects. You can make a collection of miniature pumpkins in different sizes and arrange them on a dining table, mantel, bookshelf, windowsill, or Thanksgiving centerpiece. They also make lovely additions to autumn wreaths, decorative baskets, and seasonal gift packaging.
One of the best features of this craft is that pipe cleaners naturally hold their shape when twisted correctly. This makes it possible to create rounded pumpkin sections without needing sewing, complicated stitching, or special crafting equipment.
Materials You Will Need
- Orange pipe cleaners.
- Green pipe cleaners for stems and leaves.
- Brown pipe cleaners for additional natural details.
- Small green felt leaves.
- Craft glue.
- Scissors.
- Optional wooden beads.
- A small piece of cardboard for the base.
Step-by-Step Instructions
Step 1: Prepare the pumpkin sections. Take four or five orange pipe cleaners and cut them into equal lengths. The exact length depends on how large you want your pumpkin to be. Shorter pieces are suitable for miniature decorations, while longer pieces create larger pumpkins.
Step 2: Form the rounded shape. Arrange the orange pieces side by side and gather their ends together at the top. Twist the ends securely to create a small bundle. Gently spread the opposite ends outward, forming a rounded pumpkin shape. Adjust the pipe cleaners until the structure looks balanced.
Step 3: Create the pumpkin ridges. Bend each orange section slightly inward around the middle to produce the characteristic grooves of a pumpkin. You can wrap another orange pipe cleaner around the center if you want a fuller appearance.
Step 4: Add the stem. Take a short green or brown pipe cleaner and twist it around the gathered top section. Bend the remaining part upward to create a small stem. A wooden bead can also be placed around the stem for a decorative finishing touch.
Step 5: Attach the leaves. Shape a green pipe cleaner into two or three small leaf loops. Twist the ends together and attach them near the stem. You can also use green felt leaves for a more realistic appearance.
Step 6: Make additional pumpkins. Repeat the process using different sizes and shades of orange. You can even create cream-colored or white pumpkins for a farmhouse-inspired Thanksgiving display.
Ways to Display Your Mini Pumpkins
Arrange several pumpkins inside a shallow wooden tray with artificial autumn leaves, pinecones, and small decorative acorns. For a dining table centerpiece, place them around a candle holder or alongside a seasonal floral arrangement. Smaller pumpkins can also be attached to gift bags, napkin rings, or handmade Thanksgiving cards.
Helpful Tip: Avoid pulling the pipe cleaners too tightly when shaping the pumpkin. Gentle bending creates smoother curves and prevents the fuzzy material from becoming uneven.
Pipe Cleaner Autumn Leaf Garlands
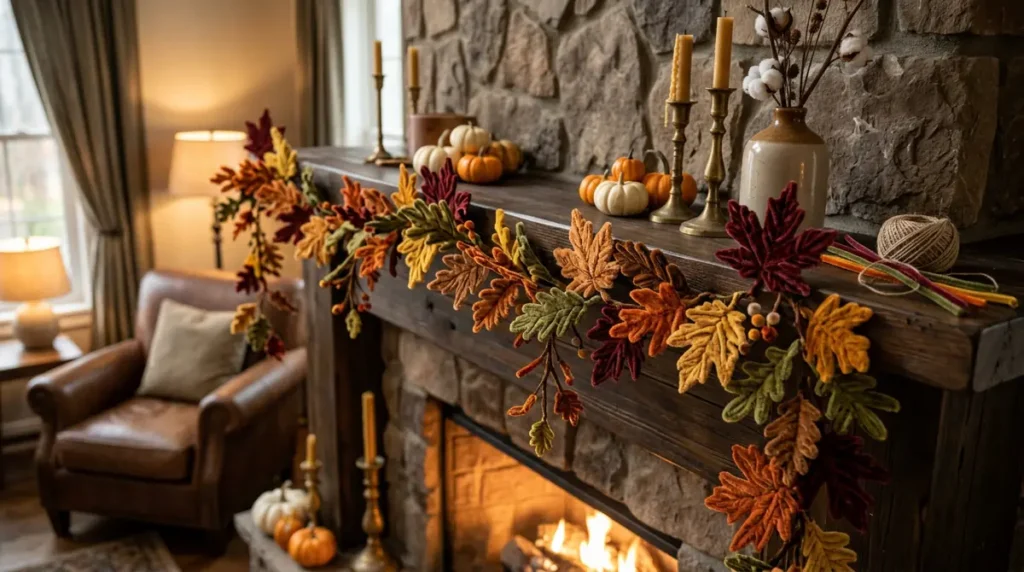
Autumn leaves are one of the most beautiful parts of the Thanksgiving season. As the weather becomes cooler, trees display stunning shades of red, orange, yellow, and golden brown. These natural colors create a warm and welcoming atmosphere that makes homes feel festive and comfortable. A pipe cleaner autumn leaf garland is a simple way to bring that seasonal beauty indoors without collecting real leaves or purchasing expensive decorations.
This project is suitable for both adults and children because the basic leaf shapes are easy to create. You can make individual leaves for small decorative arrangements or connect several leaves together to form a long garland. The finished decoration can be displayed across a fireplace mantel, along a staircase railing, around a doorway, or above a Thanksgiving dining table.
Another advantage of this craft is that you can experiment with different leaf shapes. Some can resemble maple leaves, while others can have rounded edges inspired by oak or simple oval-shaped autumn leaves. Combining several styles makes the garland look more interesting and natural.
Materials You Will Need
- Red pipe cleaners.
- Orange pipe cleaners.
- Yellow pipe cleaners.
- Brown and golden pipe cleaners.
- Thin decorative string or twine.
- Craft scissors.
- Small beads.
- Craft glue.
- Optional wooden clothespins or adhesive hooks.
Step-by-Step Instructions
Step 1: Choose your autumn colors. Select several pipe cleaner shades that resemble the changing colors of autumn leaves. A mixture of red, orange, yellow, and brown creates a traditional Thanksgiving appearance. For a softer decorative style, include gold, cream, and muted rust-colored materials.
Step 2: Create the leaf outline. Take one pipe cleaner and bend it into a pointed oval or maple-inspired shape. For a simple leaf, create one large loop and pinch both ends to form a pointed tip. Twist the ends together to hold the shape.
Step 3: Add the leaf veins. Cut a smaller piece of pipe cleaner and position it through the center of the leaf. Twist it gently around the outer frame to create a central vein. Add two smaller curved sections if you want more detailed leaf patterns.
Step 4: Shape different varieties. Make several leaves using slightly different designs. Some can have rounded edges, while others can feature pointed tips or multiple sections. This variation helps the finished garland look more natural instead of appearing like identical repeated shapes.
Step 5: Connect the leaves. Cut a suitable length of decorative twine. Attach each leaf by twisting its bottom stem around the string. Leave a little space between individual leaves so they can hang freely.
Step 6: Add decorative details. Place small beads between the leaves or twist tiny brown pipe cleaner pieces into miniature branches. You can also add a few handmade pipe cleaner acorns to make the garland more interesting.
Creative Ways to Use the Garland
Hang your finished garland above a fireplace, across a window, or around the entrance to your dining room. A shorter version can decorate a Thanksgiving dessert table, while a longer arrangement works beautifully as a backdrop for family photographs.
For classroom activities, children can make individual leaves and write something they are thankful for on small paper tags. Attach the tags to the garland to create a meaningful gratitude decoration.
Helpful Tip: Keep the leaf shapes slightly different in size and color. Natural variation gives your garland a more realistic autumn appearance and makes the finished decoration look professionally arranged.
Pipe Cleaner Corn on the Cob Decorations
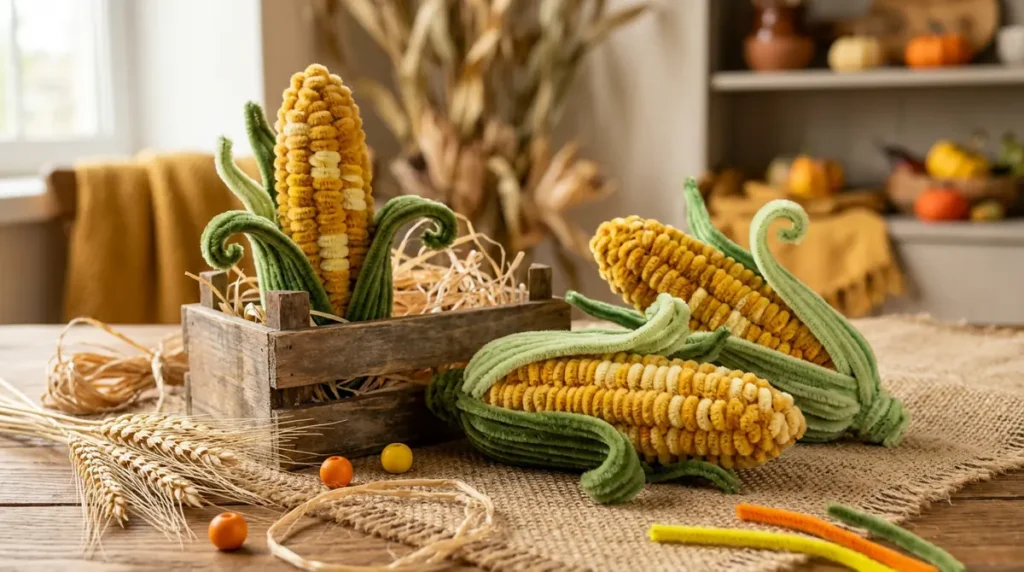
Corn is a traditional harvest symbol that fits perfectly into Thanksgiving decorating themes. It represents abundance, seasonal food, and the importance of celebrating the harvest. Creating miniature corn on the cob decorations using pipe cleaners is a fun way to incorporate this familiar autumn symbol into handmade holiday displays.
Unlike ordinary paper decorations, pipe cleaner corn has a soft, textured appearance that makes it interesting to look at and touch. You can create tiny ears of corn for table centerpieces, harvest-themed wreaths, classroom displays, or miniature Thanksgiving decorations. The project is also an excellent opportunity for children to explore different colors, textures, and shapes while practicing basic crafting skills.
Traditional corn is usually yellow, but your handmade versions can include golden, cream, orange, and even purple shades. This makes the craft suitable for colorful children’s activities as well as more natural-looking farmhouse decorations.
Materials You Will Need
- Yellow pipe cleaners.
- Golden or orange pipe cleaners.
- Green pipe cleaners for the husks.
- Brown pipe cleaners for details.
- Small yellow beads, if desired.
- Craft glue.
- Scissors.
- Small cardboard pieces.
- Optional raffia or natural twine.
Step-by-Step Instructions
Step 1: Create the corn shape. Take two or three yellow pipe cleaners and arrange them together. Bend them into an elongated oval shape with slightly rounded ends. Twist the ends together to hold the structure. This will become the main body of your miniature corn cob.
Step 2: Add the kernels. Cut small yellow pipe cleaner pieces and wrap them around the main structure in short sections. Arrange the pieces close together to create the textured appearance of corn kernels. You can also use small yellow beads attached with craft glue to make the surface more detailed.
Step 3: Improve the shape. Gently adjust the yellow sections so the cob looks full and evenly rounded. If you want a larger decoration, add another layer of yellow pipe cleaner around the center.
Step 4: Make the green husks. Take two or three green pipe cleaners and bend them into long, narrow leaf shapes. Pinch their ends to create pointed tips. Position the green pieces around the bottom and sides of the yellow cob to resemble natural corn husks.
Step 5: Attach the husks. Twist the green pipe cleaners together around the base of the corn. Allow some sections to extend upward along the sides while others curve outward. This creates the familiar appearance of an ear of corn partially covered by its leaves.
Step 6: Add finishing details. Use a short brown pipe cleaner to create a small stem or additional harvest-inspired details. You can also make several smaller cobs in different colors to create a decorative collection.
Decorating Ideas for Thanksgiving
Place three or four miniature corn decorations inside a rustic basket with artificial leaves and tiny pumpkins. This arrangement creates a charming harvest centerpiece for a dining table or kitchen counter. You can also attach small corn decorations to wreaths, seasonal gift baskets, and handmade Thanksgiving cards.
For a children’s harvest activity, provide different pipe cleaner colors and encourage them to create traditional yellow corn, colorful decorative corn, and miniature harvest arrangements.
Helpful Tip: Keep the green husks slightly loose instead of wrapping them tightly around the entire cob. This makes the corn look more natural and allows the yellow kernel texture to remain visible.
Thanksgiving Pipe Cleaner Napkin Rings
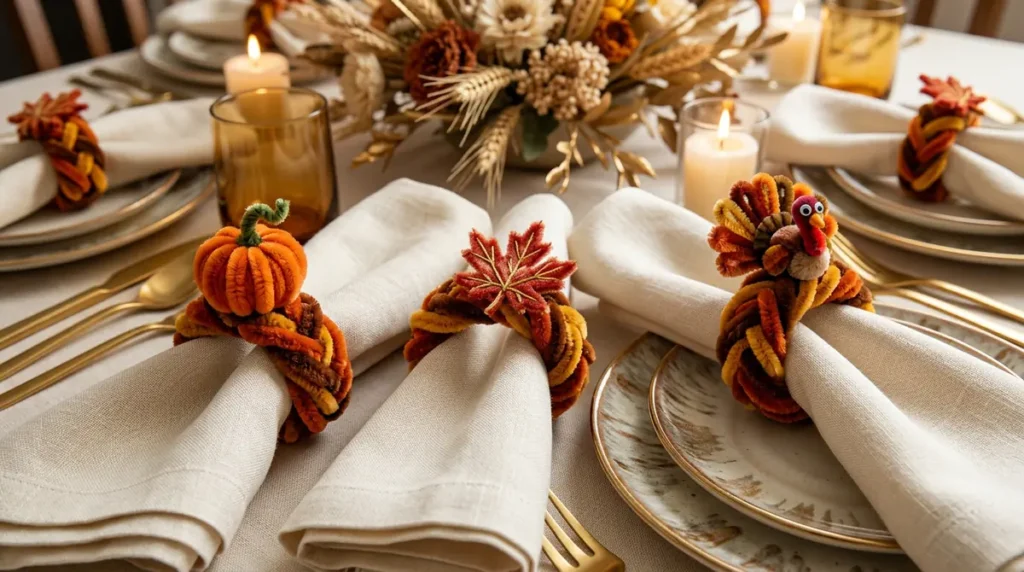
A beautifully arranged Thanksgiving table does not always require expensive decorations or elaborate dinnerware. Sometimes, small handmade details can make the entire dining experience feel more special. Pipe cleaner napkin rings are an affordable and creative way to decorate your Thanksgiving table while giving ordinary cloth napkins a festive seasonal appearance.
This project is particularly useful for people who enjoy hosting Thanksgiving dinner and want to create a welcoming atmosphere for family and guests. Instead of using plain napkin holders, you can make personalized rings decorated with miniature autumn leaves, colorful turkeys, pumpkins, or harvest-inspired designs.
The best part is that these napkin rings are highly customizable. You can coordinate the colors with your tablecloth, dinner plates, centerpiece, or other seasonal decorations. Traditional orange, yellow, and brown create a warm autumn appearance, while gold, cream, and deep red provide a more elegant Thanksgiving style.
Materials You Will Need
- Orange pipe cleaners.
- Brown pipe cleaners.
- Yellow and red pipe cleaners.
- Green pipe cleaners.
- Small artificial autumn leaves.
- Craft glue.
- Scissors.
- Decorative beads.
- Cloth or paper napkins.
- Optional small felt turkey or pumpkin shapes.
Step-by-Step Instructions
Step 1: Measure the napkin ring. Take a pipe cleaner and wrap it gently around a rolled napkin to determine the required size. Leave enough space for the napkin to slide in and out comfortably. Twist the ends together securely to form a circular ring.
Step 2: Strengthen the base. Wrap a second pipe cleaner around the first ring to make it thicker and more durable. You can use a single color or combine orange and brown for a traditional autumn appearance.
Step 3: Create a decorative centerpiece. Choose a small Thanksgiving-inspired decoration. A miniature pipe cleaner pumpkin, turkey, or autumn leaf works particularly well. Create the selected shape using the techniques from the previous projects.
Step 4: Attach the decoration. Twist the bottom of the decorative shape around the napkin ring. If necessary, add a small amount of craft glue to secure lightweight accessories. Make sure the decoration remains firmly attached.
Step 5: Add smaller details. Use short green pipe cleaner pieces to create leaves or tiny vines. You can also add a decorative bead in the center of a flower-shaped arrangement or place two miniature leaves beside the main decoration.
Step 6: Make a matching set. Repeat the same process for every napkin ring you need. Keep the basic ring design consistent, but personalize each decoration with different colors or small details.
Ways to Personalize Your Table
For a family Thanksgiving dinner, consider making a different napkin ring for each guest. Attach a small paper name tag to the ring to create personalized place settings. Children can help decorate the rings, making the preparation process a fun family activity.
You can also create different themes for different occasions. Miniature pumpkins work well for a rustic autumn table, while gold and red leaves are suitable for a more elegant dining arrangement. Turkey decorations are especially charming for children’s Thanksgiving tables.
Helpful Tip: Keep decorative attachments lightweight and avoid sharp wire ends. If you plan to reuse the napkin rings, store them in a small box after the holiday to prevent the pipe cleaners from becoming bent or crushed.
Pipe Cleaner Thanksgiving Flower Bouquets
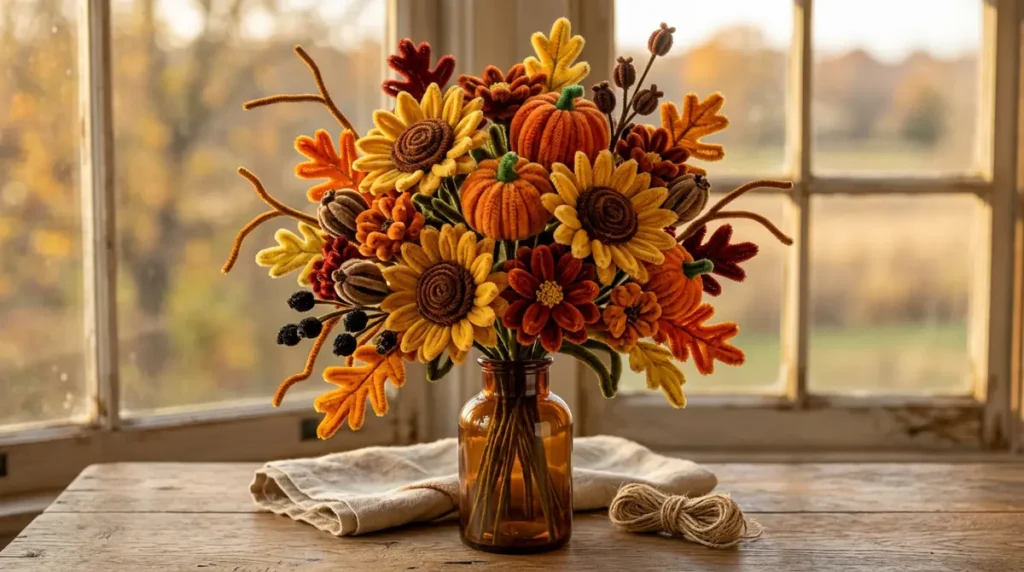
Flowers are not limited to spring and summer decorations. Autumn-inspired flower arrangements can bring warmth, color, and creativity to Thanksgiving celebrations. A pipe cleaner flower bouquet is a lovely handmade decoration that combines the flexibility of pipe cleaners with the beauty of seasonal colors. These flowers can resemble simple daisies, sunflowers, chrysanthemums, and other decorative blooms.
Unlike fresh flowers, pipe cleaner bouquets do not wilt or require watering. Once completed, they can be displayed throughout the Thanksgiving season and stored for future autumn celebrations. They are also a thoughtful handmade gift for teachers, grandparents, friends, and family members.
This project is suitable for adults and older children who enjoy making detailed decorations. Younger children can participate by choosing colors, shaping simple petals, and arranging finished flowers with adult assistance.
You do not need professional flower-making skills to complete this craft. The main technique involves creating small loops for petals and attaching them around a central flower section. By combining different colors and petal arrangements, you can produce an attractive bouquet that looks completely different from ordinary store-bought decorations.
Materials You Will Need
- Yellow pipe cleaners.
- Orange and red pipe cleaners.
- Cream or white pipe cleaners.
- Green pipe cleaners for stems.
- Small yellow or brown beads.
- A small decorative vase.
- Floral tape, if available.
- Craft glue.
- Scissors.
- Optional artificial leaves.
Step-by-Step Instructions
Step 1: Choose your flower colors. Select colors inspired by the Thanksgiving season. Orange, yellow, red, cream, and golden brown are excellent choices. You can make each flower a different color or create a matching bouquet with coordinated shades.
Step 2: Create the petals. Take one pipe cleaner and bend it into a small loop. Twist the ends together to hold the shape. Repeat this process until you have five or six loops for a single flower. Arrange the loops in a circle to form the petals.
Step 3: Make the flower center. Use a short yellow or brown pipe cleaner to create a small spiral. Attach it to the middle of the petals. A decorative bead can also be used as the flower center if it is securely attached.
Step 4: Add the stem. Take a green pipe cleaner and twist one end around the back of the flower. Straighten the remaining length to create a stem. For additional strength, wrap two green pipe cleaners together.
Step 5: Create leaves. Bend small green pipe cleaner pieces into pointed oval shapes. Twist their ends around the stem to attach them. Position one or two leaves along each stem for a more natural appearance.
Step 6: Make a complete bouquet. Repeat the process to create several flowers in different sizes. Arrange them together and adjust the stems until the bouquet has a balanced appearance.
Creative Ways to Display Your Bouquet
Place the finished flowers in a small glass jar, ceramic vase, or rustic wooden container. You can wrap the vase with burlap or natural twine to create a farmhouse-inspired decoration. Add a few miniature pipe cleaner leaves around the base for extra seasonal detail.
A smaller bouquet can also decorate a Thanksgiving dessert table, kitchen shelf, or entryway. If you are preparing handmade gifts, wrap a few flowers together with ribbon and attach a small gratitude message.
Helpful Tip: Make flowers in different sizes rather than creating every bloom identically. Larger sunflowers paired with smaller autumn flowers produce a fuller and more visually interesting arrangement.
Pipe Cleaner Thanksgiving Gratitude Wreaths
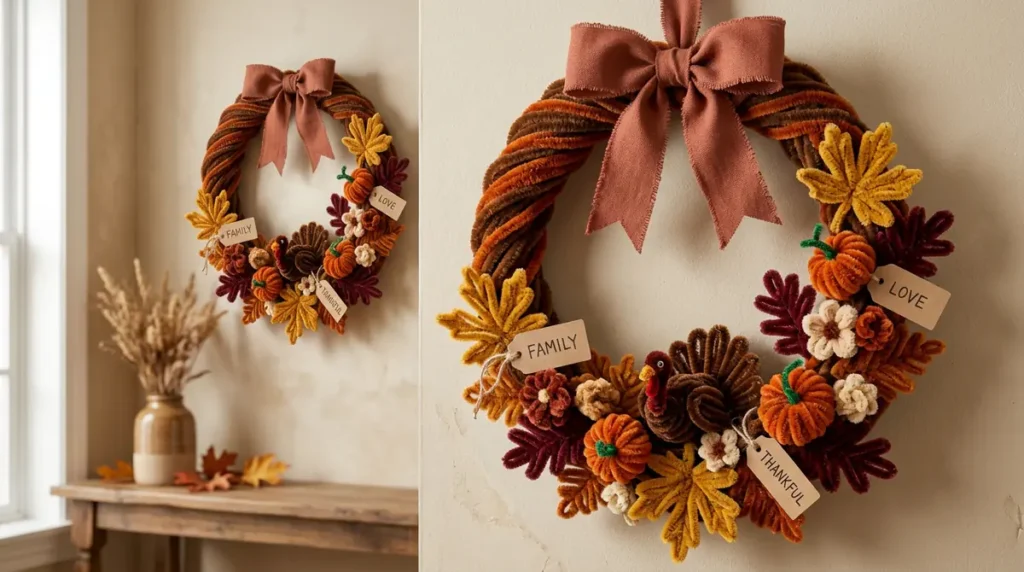
Thanksgiving is not only about decorations and delicious food; it is also a time to reflect on gratitude, family, friendship, and the meaningful things in everyday life. A pipe cleaner Thanksgiving gratitude wreath is a wonderful craft that combines seasonal decoration with a positive holiday message. It can become a beautiful handmade centerpiece for your home while reminding family members to appreciate the people and experiences that make life special.
Unlike traditional wreaths made from branches or artificial flowers, this project uses flexible pipe cleaners to create a colorful and lightweight decoration. You can customize the wreath with miniature pumpkins, autumn leaves, turkeys, flowers, and small gratitude messages. The finished piece looks lovely on a front door, above a fireplace, or on a wall near the Thanksgiving dining area.
This craft is especially meaningful for families with children because everyone can contribute something to the final design. Each family member can create a small decoration or write a message about something they appreciate. These messages can then become part of the finished wreath.
Materials You Will Need
- Brown pipe cleaners for the wreath base.
- Orange pipe cleaners.
- Yellow and red pipe cleaners.
- Green pipe cleaners.
- Small handmade pipe cleaner pumpkins and leaves.
- Decorative beads.
- Thin ribbon.
- Cardstock or construction paper.
- Craft glue.
- Scissors.
- Optional cardboard wreath base.
Step-by-Step Instructions
Step 1: Prepare the wreath base. Take several brown pipe cleaners and twist them together to form a circular shape. Make the circle as large or small as you prefer. For a stronger structure, attach the pipe cleaners around a lightweight cardboard ring.
Step 2: Add autumn colors. Wrap orange, yellow, and red pipe cleaners around the brown base. Alternate the colors to create a warm seasonal appearance. You can also leave some sections brown to resemble natural branches.
Step 3: Create decorative leaves. Make several miniature autumn leaves using the loop technique. Choose different colors and sizes to create variety. Attach the leaves around the wreath by twisting their stems securely around the base.
Step 4: Add Thanksgiving decorations. Create two or three miniature pumpkins, a small turkey, or a few pipe cleaner flowers. Arrange these decorations around the wreath. Position larger pieces near the bottom or along one side to create a balanced design.
Step 5: Include gratitude messages. Cut small paper tags and write short messages such as “Thankful for Family,” “Grateful for Friends,” or “Blessed with Love.” Attach the messages to the wreath using ribbon or small pipe cleaner loops.
Step 6: Add a hanging loop. Take a piece of ribbon or brown pipe cleaner and attach it to the top of the wreath. Check that the loop is secure before hanging the finished decoration.
How to Make It a Family Activity
Turn the project into a Thanksgiving gratitude tradition by inviting every family member to contribute a decoration and a message. Younger children can make colorful leaves, while older children and adults can create miniature pumpkins and turkeys.
You can also create a new gratitude wreath every year. Save the previous wreaths or photograph them to remember what your family appreciated during each Thanksgiving celebration.
For classroom activities, ask students to write one thing they are thankful for on a small paper leaf. Attach all the leaves to a shared wreath to create a meaningful classroom decoration.
Helpful Tip: Keep the decorations evenly distributed so the wreath does not become too heavy on one side. If you are hanging it on a door, use a sturdy hanging hook and check that all small decorative pieces are securely attached.
Conclusion
Thanksgiving pipe cleaner crafts are a wonderful way to bring creativity, seasonal beauty, and family togetherness into your holiday celebrations. With just a few affordable supplies and some imagination, you can transform ordinary colorful pipe cleaners into beautiful handmade decorations that make your home feel warm and welcoming.
From adorable Thanksgiving turkeys and miniature pumpkins to colorful autumn leaf garlands, corn decorations, personalized napkin rings, flower bouquets, and gratitude wreaths, these seven projects offer plenty of inspiration for both children and adults. Each craft provides an opportunity to experiment with colors, practice creative skills, and make something meaningful without spending a lot of money.
One of the best things about these projects is their flexibility. You can make simple decorations with younger children, create more detailed arrangements as an adult, or turn the entire experience into a family Thanksgiving crafting afternoon. Many of these handmade decorations can also be reused in future years, making them practical additions to your seasonal collection.
Remember that handmade crafts do not need to look perfect to be special. Different shapes, playful colors, and personalized details are what make DIY decorations unique. Encourage everyone to experiment, share ideas, and enjoy the creative process rather than focusing only on the finished result.
Whether you are preparing for a Thanksgiving dinner, organizing a classroom activity, decorating your home for autumn, or looking for an affordable holiday project, these Thanksgiving pipe cleaner crafts are an excellent place to start. Gather your favorite colors, bring out your crafting supplies, and enjoy making beautiful decorations that celebrate the warmth and gratitude of the Thanksgiving season.