7 Easy DIY Thanksgiving Crafts to Elevate Your Holiday Decor
Transforming your home for the autumn season does not require spending a fortune at high-end home decor boutiques. Engaging in hands-on crafting allows you to personalize your living space, create memorable family traditions, and set an inviting, festive atmosphere for Thanksgiving dinner. Whether you are looking to design an elegant table centerpiece, craft child-friendly holiday activities, or add cozy seasonal accents throughout your entryway, handmade projects bring an authentic warmth to your celebrations.
Below is an exhaustive, step-by-step guide featuring 7 detailed DIY Thanksgiving craft ideas. Each project includes clear material breakdowns, precise execution steps, styling suggestions, and practical tips to ensure your festive creations turn out picture-perfect.
Upcycled Sweater Mug Cozies and Decorative Candle Sleeves
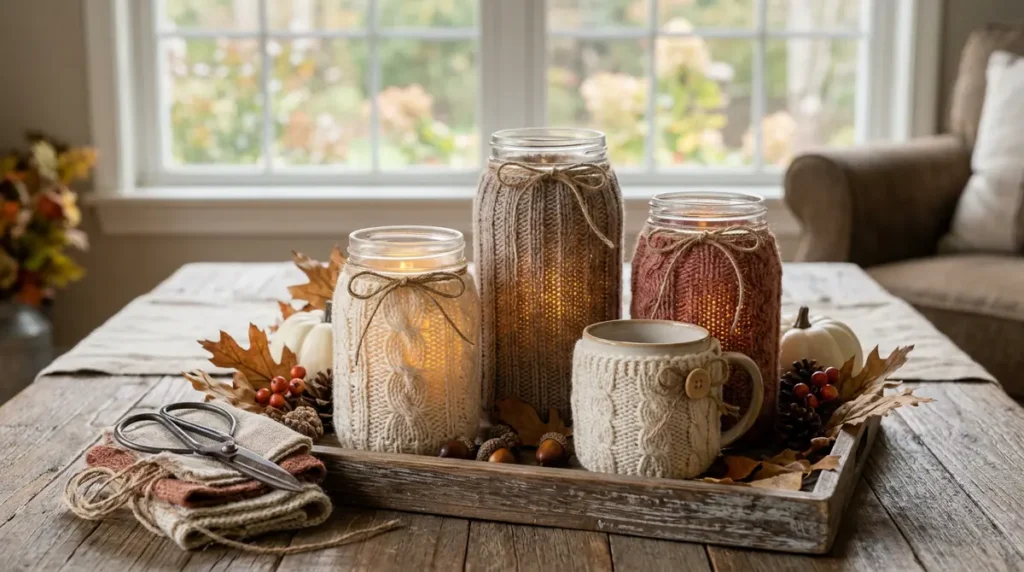
Bringing tactile warmth into your home decor is one of the most effective ways to establish a cozy autumn vibe. Upcycling thrifted or old knit sweaters into customized mug cozies and candle sleeves adds immediate texture to your coffee table, mantel, or Thanksgiving brunch setup. This eco-friendly craft transforms worn-out garments into practical, insulating accessories that protect your hands from hot beverages while serving as charming focal points during crisp November gatherings.
Required Materials
- Old knit sweaters (cable knit, ribbed, or textured patterns work best)
- Fabric scissors or sharp tailor shears
- Fabric glue or hot glue gun with clear glue sticks
- Needle and heavy-duty embroidery thread or yarn
- Assorted wooden buttons, felt leaves, or jute twine for embellishment
- Glass mason jars, pillar candle holders, or ceramic mugs for sizing
Step-by-Step Instructions
- Prepare and Measure: Select the sweater sleeve or lower hem section. Slide your glass jar, candle holder, or coffee mug inside the sleeve to determine the necessary width and height. Leave an extra half-inch of fabric at both top and bottom raw edges to accommodate clean hem folding.
- Cut the Fabric: Using sharp fabric scissors, slice cleanly across the sweater sleeve perpendicular to the weave. Avoid tugging on raw threads to prevent the knitting from unraveling before it is secured.
- Secure the Raw Edges: Turn the cut sleeve tube inside out. Apply a neat line of hot glue or fabric adhesive along the cut rim, folding back a quarter-inch seam to permanently lock the yarn fibers in place. Alternatively, run a quick blanket stitch along the cut edge using matching yarn and a tapestry needle.
- Tailor for Mugs (Optional): If tailoring for a mug with a handle, cut a vertical slit along one side of the cozy. Fold the raw cut edges inward and secure with adhesive. Sew a wooden button to one side of the opening and attach an elastic yarn loop to the opposite side to fasten the cozy around the handle.
- Add Decorative Accents: Wrap jute twine around the center of your cozy, tie a relaxed bow, and tuck a small dried oak leaf or faux berry stem beneath the knot. Slide your newly tailored sleeve onto a glass pillar candle holder or mug.
Styling Tip
Group three sweater-wrapped glass jars of varying heights on a rustic wooden tray. Insert battery-operated flameless LED candles inside each jar to emit a soft, warm glow through the sweater weave without posing any fire hazards.
Rustic Salt Dough Snowman and Pumpkin Keepsake Ornaments
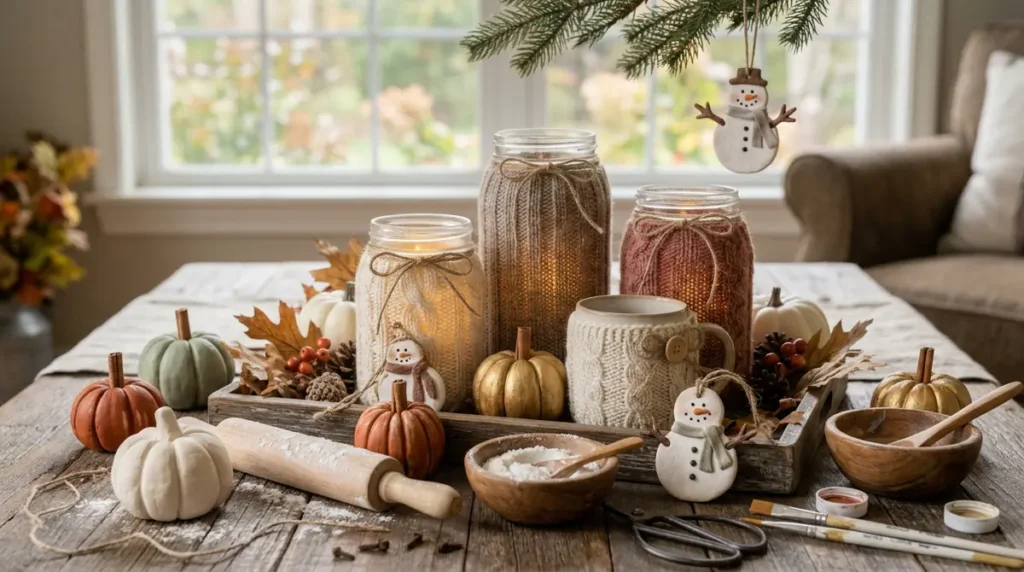
Salt dough crafts are a versatile, highly accessible medium ideal for makers of all skill levels. By combining simple pantry staples, you can model dimensional autumn pumpkins, early winter snowmen, and custom place-card holders. These baked clay pieces dry rock-hard, allowing you to paint intricate patterns, stamp guest names, or capture children’s handprints as lasting Thanksgiving keepsakes that can be displayed year after year.
Required Materials
- 2 cups all-purpose flour
- 1 cup table salt
- 1 cup warm water
- Acrylic craft paints (burnt orange, cream, deep brown, sage green, gold)
- Paintbrushes (flat wash brush and fine-tip detail brush)
- Clear matte or satin acrylic sealer spray
- Whole cloves, small cinnamon sticks, or twine loops
Step-by-Step Instructions
- Mix the Dough: Combine the all-purpose flour and table salt in a large mixing bowl. Gradually pour in the warm water while stirring continuously until a firm, smooth dough forms. Transfer to a lightly floured surface and knead manually for 5 minutes until completely pliable.
- Sculpt the Shapes: Divide the dough into small portions. To create dimensional pumpkins, roll a portion into a smooth ball, gently flatten the top and bottom slightly, and use a toothpick or butter knife to press vertical ridge lines into the sides from top to bottom. Press a small cinnamon stick or whole clove into the top center to serve as the stem. To make flat ornament plaques, roll dough to a quarter-inch thickness with a rolling pin and cut shapes using cookie cutters.
- Bake and Dry: Place finished shapes on a parchment-lined baking sheet. Bake in an oven preheated to 250°F (120°C) for 2 to 3 hours, turning pieces halfway through, until completely hard and moisture-free. Allow to cool entirely.
- Paint and Detail: Apply a base coat of acrylic paint across all surfaces. Layer darker shading into the pumpkin grooves using a fine detail brush to add realistic depth. For snowmen or placeholder plaques, use fine-tip paint pens to write guest names or draw festive accent details.
- Seal for Durability: Once paint is thoroughly dry, apply two thin coats of clear acrylic sealer spray in a well-ventilated area. This seals out atmospheric moisture and prevents dough degradation over time.
Maintenance Tip
Store your salt dough keepsakes in airtight plastic containers lined with tissue paper after the holidays. Keep them away from high-humidity areas like damp basements to preserve their structural integrity.
Seed Bead Fringe Earrings for Festive Holiday Attire
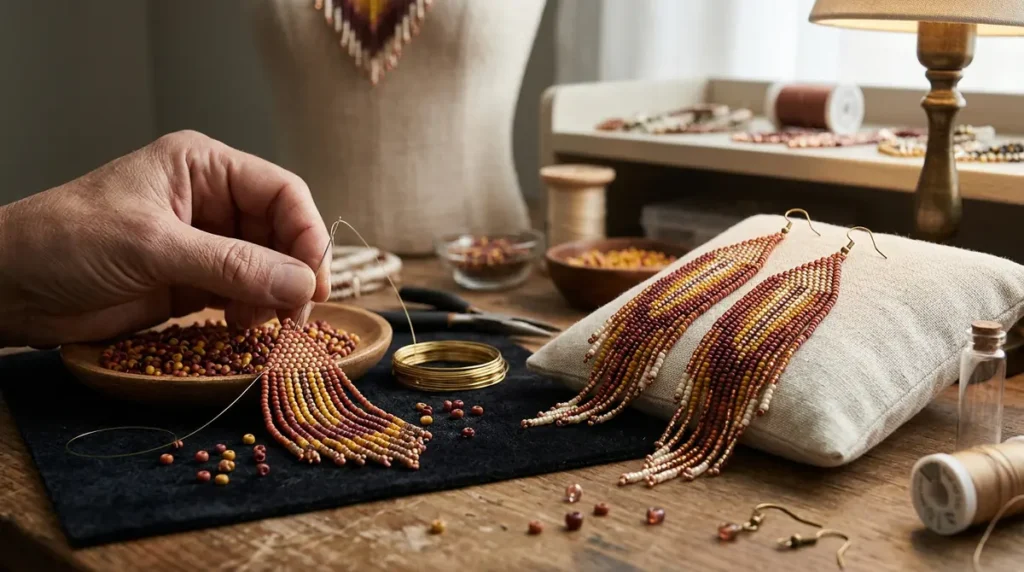
Adding a touch of artisanal sparkle to your holiday outfit is easy with handmade seed bead fringe earrings. Designed in warm, autumn-inspired palettes—such as rich amber, copper, mustard yellow, burgundy, and ivory—these drop earrings catch light beautifully during dinner celebrations. Crafting beadwork offers a therapeutic, methodical process that produces boutique-quality jewelry suitable for personal wear or thoughtful hostess gifts.
Required Materials
- Size 11/0 Japanese glass seed beads (crimson, metallic bronze, terracotta, cream)
- Beading thread (Nymo or FireLine in neutral shades)
- Size 10 or 12 beading needles
- 2 fishhook ear wires (gold or brass tone)
- Beading mat or felt scrap
- Sharp thread snips or embroidery scissors
Step-by-Step Instructions
- Prepare Thread and Anchor: Cut a 40-inch length of beading thread and thread your beading needle. String a single anchor bead, looping thread through it twice to prevent beads from slipping off the bottom.
- Build the Triangle Header: Using brick stitch or ladder stitch, construct a small triangular header base that is 5 to 7 beads wide at the bottom row. This woven header will support the dangling fringe strands and house the top attachment loop.
- Weave the First Fringe Strand: Pick up a predetermined sequence of seed beads on your needle to form the first fringe line (e.g., 5 cream, 3 bronze, 8 terracotta, 3 metallic gold). Slide all beads up tight against the bottom row of your header triangle.
- Return Thread Through Fringe: Bypass the very last bead strung (which acts as a stop bead), and pass your needle back up through all remaining beads in that strand, exiting through the corresponding header bead at the top. Pull thread snugly so the strand hangs freely without visible gaps or excessive stiffness.
- Complete All Strands and Attach Findings: Repeat the fringe process for each bottom header bead, gradually increasing and decreasing strand lengths if creating an angled or chevron silhouette. Weave remaining thread ends back through the header structure, tie secure knots, and trim excess. Attach a brass fishhook ear wire to the top loop of the header using small jewelry pliers.
Colorway Recommendation
Combine matte terracotta beads with shiny metallic copper and opaque cream to achieve an ombre gradient that mirrors falling autumn leaves.
Farmhouse Thanksgiving Porch and Entryway Display
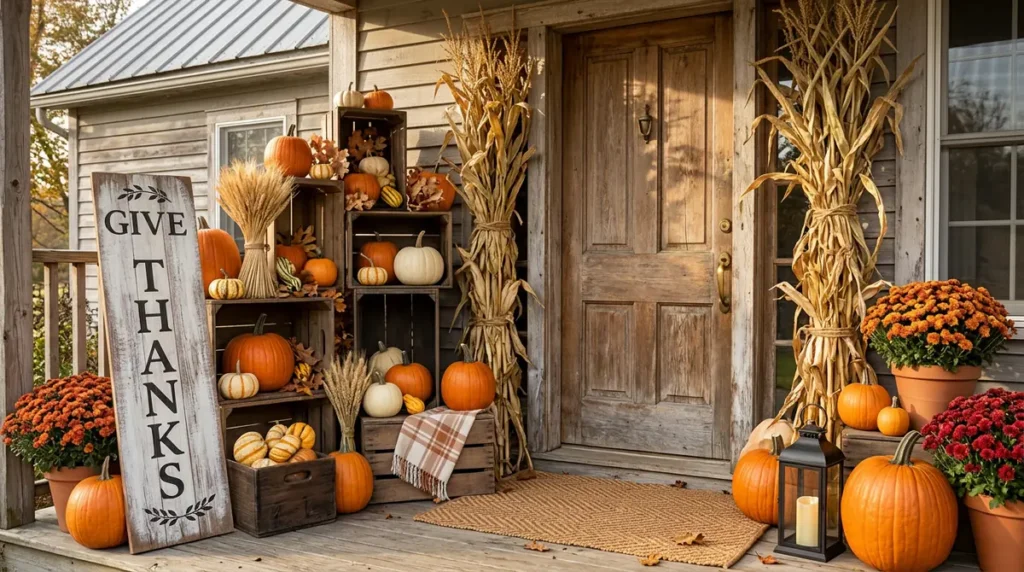
Your entryway sets the tone for your holiday gathering long before guests step inside. A farmhouse-inspired porch display combines natural elements, rustic textures, and vintage accents to create a cozy, welcoming entrance. Utilizing repurposed wooden crates, layered textiles, native corn stalks, and hand-painted wooden signage allows you to build an impressive visual focal point tailored specifically to autumn’s harvest themes.
Required Materials
- Repurposed wooden milk crates or rustic apple boxes
- Assorted heirloom pumpkins, ghost pumpkins, and gourds of varying shapes
- Dried corn stalks, bundle of wheat sheaves, and potted orange chrysanthemums
- Reclaimed pallet board or piece of pine lumber
- Acrylic paint or exterior latex paint (chalk white, matte black, walnut stain)
- Stencils, paint sponges, and coarse sandpaper
- Battery-operated outdoor lantern with timer
Step-by-Step Instructions
- Construct the Wooden Sign: Sand your reclaimed board lightly to remove splinters while retaining rustic wood grain textures. Apply a layer of walnut stain or dark paint, let dry, and brush white chalk paint over top. Once dry, lightly sand edges and surface spots to create a distressed vintage finish.
- Stencil the Holiday Message: Lay stencils spelling out phrases like “Give Thanks,” “Gather,” or “Harvest Welcome” centered along the board. Dabs of black latex paint applied with a dense foam sponge will create crisp, legible lettering. Allow to cure completely before moving outdoors.
- Build Vertical Elevation: Arrange two to three wooden crates on your porch near the front doorway. Stack one crate vertically on its side and place another horizontally beside it to establish dynamic height variations across your display footprint.
- Layer Natural Elements: Position tall dried corn stalks upright behind the crates, securing them to porch railings with heavy-duty zip ties. Place vibrant potted chrysanthemums inside or atop the crates so flowers overflow down the front.
- Arrange Gourds and Lighting: Nestle heirloom pumpkins across the crate steps and floor space, cascading larger orange pumpkins at the base and smaller white gourds along elevated ledges. Finish by placing a black metal lantern with an automatic flickering LED candle near the front corner.
Design Tip
Always work in odd-numbered groupings (3, 5, or 7) when clustering pumpkins and gourds to achieve a natural, balanced layout rather than a rigid or symmetrical pattern.
Layered Fall Leaf and Botanical Harvest Wreath
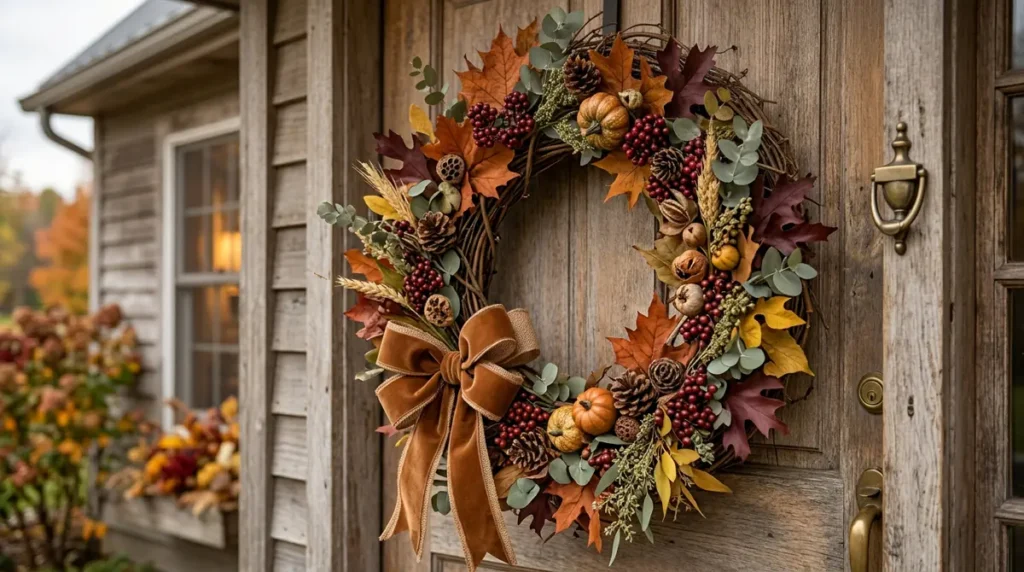
A vibrant botanical wreath on your front door or above the fireplace mantel serves as a striking symbol of harvest abundance. Constructing your own wreath gives you full control over color balance, foliage density, and textural contrast. By layering artificial maple leaves, preserved eucalyptus branches, faux berries, and mini pinecones onto a natural grapevine frame, you create a timeless seasonal piece that resists fading and lasts for years.
Required Materials
- 18-inch natural grapevine wreath base
- Assorted faux autumn foliage stems (maple leaves, oak leaves, eucalyptus)
- Artificial berry sprigs (deep burgundy, mustard yellow, burnt orange)
- Mini natural pinecones and dried lotus pods
- Floral wire (22-gauge) and wire cutters
- Hot glue gun and high-temp glue sticks
- 2.5-inch wide wired burlap or velvet ribbon
Step-by-Step Instructions
- Prep the Base and Focal Point: Inspect your grapevine base, trimming any wildly protruding twigs while keeping the natural round shape intact. Determine where your visual focal point will sit (typically the bottom-left quadrant or centered along the bottom rim).
- Establish the Background Greenery: Trim foliage stems into 6-to-8-inch picks using wire cutters. Insert the stem ends directly into the woven grapevine strands, angling all leaves in a single direction (clockwise or counter-clockwise). Secure stem bases with hot glue or floral wire wraps.
- Layer Accent Leaves and Texture: Insert contrasting leaf species, such as muted sage green eucalyptus or dark oak foliage, beneath the primary maple leaves. Layering different shapes and muted color tones prevents your wreath from looking flat or overly uniform.
- Add Berries and Pinecones: Group artificial berry stems in clusters of three and distribute them evenly around the wreath circumference. Use hot glue to attach mini pinecones and dried lotus pods near the designated focal area, tucking them snugly between leaf bunches.
- Craft and Attach the Ribbon Bow: Loop your wired burlap or velvet ribbon into a classic four-loop bow with long trailing tails. Wrap a length of floral wire around the center knot, twist tightly, and anchor the bow securely onto the grapevine frame at your focal point.
Crafting Tip
Use wired ribbon for holiday wreaths because the structural wire edges allow you to fluff, shape, and repose bow loops easily after storage or exposure to outdoor winds.
Personalizable Wooden Slice Thanksgiving Place Cards
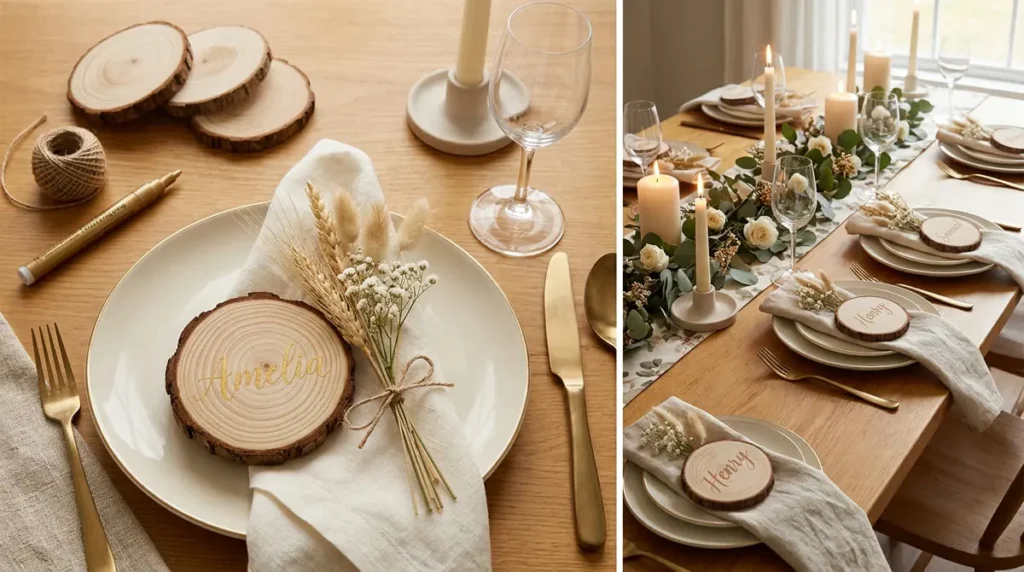
A thoughtfully set dinner table makes guests feel immediately welcomed and cherished. Personalized wooden slice place cards add rustic charm to individual place settings while serving as memorable take-home tokens from your holiday feast. Combining natural wood grain with elegant lettering, dried botanical sprigs, and twine accent loops bridges the gap between casual family style and sophisticated holiday dining.
Required Materials
- 2 to 3-inch pre-sanded natural wood slices (with bark edging retained)
- Fine-tip metallic paint pens (gold, silver, or copper) or wood-burning tool
- Small hand drill with 1/16-inch drill bit (optional)
- Mini dried floral stems (baby’s breath, bunny tails, wheat sprigs)
- Jute twine or narrow velvet ribbon
- Clear matte lacquer sealing spray
Step-by-Step Instructions
- Prep Wood Surfaces: Wipe wood slices clean with a microfiber cloth to remove residual sawdust. Ensure the surface wood is completely dry so ink does not bleed into the wood grain fibers.
- Letter Guest Names: Using pencil, lightly sketch your guests’ first names or initials in script or block calligraphy across the center of each wood slice. Trace over the pencil markings with a fine-tip metallic gold or copper paint pen, using light pressure on upstrokes and firmer pressure on downstrokes. Alternatively, burn names into the surface using a pyrography tool.
- Drill Attachment Holes (Optional): If you plan to tie place cards around napkins or wine glass stems, carefully drill a small hole near the top edge of each slice using a tiny drill bit. Wipe away excess dust.
- Seal the Lettering: Spray a light coat of clear matte lacquer over the written surface to lock in paint pen pigment and prevent smudging during handling.
- Bundle with Mini Botanicals: Tie a small cluster of dried wheat and bunny tails together with jute twine. Glue or loop the tiny bouquet along the top or side edge of the wood slice, allowing greenery to frame the name elegantly.
Table Placement Suggestion
Set each wood slice directly atop a folded linen napkin placed inside a shallow soup bowl, or tie it around a cinnamon-stick napkin bundle for an extra layer of autumn fragrance.
Felt Harvest Turkey and Leaf Activity Garland for Kids
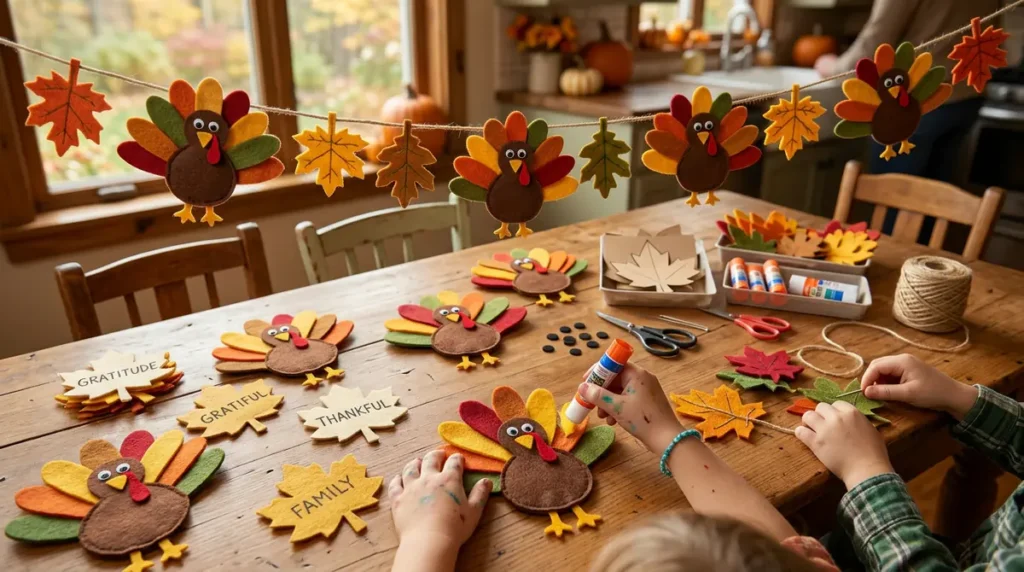
Keep younger holiday guests engaged and entertained by incorporating interactive crafting into your Thanksgiving timeline. A colorful felt turkey and leaf garland provides a fun, mess-free activity for children that doubles as festive decor for your mantle, staircase, or kid table backdrop. Pre-cutting simple felt shapes allows young children to practice hand-eye coordination through assembling, pasting, and stringing their own custom decorations.
Required Materials
- Craft felt sheets (brown, orange, red, yellow, cream, forest green)
- Googly eyes or small black felt dots
- Kid-safe washable fabric glue or glue sticks
- Hole punch or yarn needle
- Heavy cotton twine, jute yarn, or ribbon (6 to 8 feet)
- Scissors and cardstock template cutouts
Step-by-Step Instructions
- Prepare Felt Templates: Trace simple leaf silhouettes (maple, oak, birch) and basic turkey shapes (bowling-pin body shape and fan-shaped tail feathers) onto cardstock. Cut out patterns to serve as master templates.
- Pre-Cut Felt Pieces: Use your templates to cut out brown felt turkey bodies, vibrant multi-colored tail feathers, yellow felt beaks, red felt wattles, and an array of colorful autumn leaves from your felt sheets.
- Assemble Turkey Characters: Have children apply craft glue to attach colorful feather layers behind the brown turkey body. Next, let them glue googly eyes, a yellow triangular beak, and a red wattle onto the head section. Allow pieces to dry flat for 15 to 20 minutes.
- Punch Threading Holes: Using a single-hole punch or yarn needle, create two small parallel holes near the top edge of each felt leaf and across the top of each completed turkey body.
- String the Garland: Thread your twine or yarn through a blunt tapestry needle. Guide children as they alternate stringing felt leaves and assembled turkeys onto the line, spacing pieces approximately 3 to 4 inches apart until your desired garland length is achieved.
Interactive Addition
Write things your family is grateful for directly onto the felt leaves using fabric markers before stringing them onto the garland, creating a meaningful visual record of your holiday gratitude.
Conclusion
Handmade Thanksgiving crafts offer a wonderful opportunity to slow down, express creativity, and infuse your home with genuine personal warmth. From upcycled textiles and natural botanical wreaths to interactive children’s garlands and elegant table settings, these seven projects demonstrate that impactful holiday decor can be achieved with accessible materials and straightforward techniques. By dedicating a little time to craft ahead of the holiday, you not only create beautiful decorative elements for your home but also generate cherished memories and lasting traditions for family and friends gathered around your table.